Quadcopters and Spatially-Centric Data
Posted: July 28, 2013 Filed under: Milestones | Tags: appalachian mountains, bitcraze, embedded systems, exploratory flight, high spatial resolution, humidity light, microclimates, proximity, quadcopters, sensing, sensors, spatial resolutions Leave a comment
A few months ago I came across my new favorite toy, the Crazyflie nano quadcopter. Developed by Bitcraze, the Crazyflie is an open source firmware and hardware flying development board. With a relatively beefy STM32 ARM Cortext-M3 MCU and an expansion header the Crazyflie is an ideal candidate for upgrades and modifications. With such expandability, spare CPU cycles and RAM, it should be possible to interface the Crazyflie with the sensors necessary to facilitate autonomous flight and abiotic variable detection. Given the extremely flexible mobility of the Crazyflie, these variables can be detected nearly anywhere in space.
The Crazyflie is an ideal candidate for unplanned, exploratory flight paths. Imagine a little quadcopter with a bounded area to explore in the X, Y, Z axis. The purpose is to explore the matrix in the most efficient manner possible, while altering the flight path real-time given physical obstacles. If a quadcopter can explore an area in this manner efficiently with a few sensors in tow it is possible to develop a spatially-centric data set; that is a data set with very high spatial resolution and moderate temporal resolution.
Why is this useful? Traditionally data has been fetched at high frequencies in static locations. Areas between those locations are given interpolated values. Often these values are good enough, but in complex environments key data points are often absent and thus the interpolated values are not a good representation of the area in question. For example in the Appalachian mountains (where I live), temperature, humidity, light levels, and other abiotic variables can change drastically in a matter of feet. Each of these little areas are called microclimates and foster very specific plants, animals, and fungi. Accurate habitat prediction can be quite difficult with low spatial resolutions.
A more familiar example is cold air detection in an old house during winter. While your upstairs and downstairs thermometers are reading the average temperatures in their respective locations, cracks and holes near windows and doors allow much cooler air to enter the house. With only 2 static sensors it is not possible to pinpoint these areas. Interpolating values around the sensors is of little help. However, with a spatially-centric data set obtained by a quadcopter, areas of cold air can easily be identified.
Several technical challenges need to be overcome to facilitate the autonomous exploration of space. The Crazyflie kit I ordered has a few extra sensors including a magnetometer (compass) and altimeter (altitude) and can be interfaced with a GPS unit. These sensors can provide a basic sense of space, so let’s assume we can determine the Crazyflie’s location given a point in time. Let’s also assume we can programmatically control the Crazyflie well enough to move to a desired location at some resolution X. Our last challenge is to keep the Crazyflie from bumping into things. To solve this problem, we will mimic a bat and use an ultrasonic proximity sensor for object detection.
The focus of this article is on selecting a proximity sensor, setting up a Crazyflie development and debugging environment, and learning how to program MCUs in general. There is also a very concise HOWTO on interfacing a proximity sensor with the Crazyflie that omits my opinions and tips for learning how to program MCUs. Also be aware that while in this article I do include some very specific tips that I found useful in this project, I have assumed a general level of familiarity with Linux, compiling from source, checking out code, etc. and I do not include help that can easily be found elsewhere.
C, Vim, Cscope, and the ARM Development Environment
I’ve never professionally programmed in C, so it was necessary to spend some time reviewing the language (funny though that it was the first language I learned back in middle school). “The C Programming Language” by Brian W. Kernighan and Dennis M. Ritchie is excellent. I’ve always found it difficult to find programming books that fit somewhere between “Learn X in N days” and the spec. I guess that’s what reference books are for, but this felt better than most. If you are an experienced programmer and need a great course in C, this is your book. If you are not, try the tutorial in the beginning. If it seems overwhelming, start with an introductory book. Otherwise, work through the exercises for a few weeks and you’ll be well on your way.
To review the firmware, I chose to keep things simple and run Cscope on top of Vim (check out the tutorial). Building and installing Cscope from source on OS X was easy; on this platform Vim already has Cscope support compiled in. To generate the Cscope database, navigate to your project’s root directory and recursively search for source files and build a Cscope database (this assumes you have checked out the crazyflie firmware in your home directory):
cd ~/crazyflie-firmware
cscope -Rb
I prefer to load the Cscope database by hand once inside of Vim. If we are to begin with main.c in our research, we must specify the location of the Cscope database and the relative path from which files will be located:
cd init
vim main.c
:cs add ../cscope.out ~/crazyflie-firmware
Exploring the code was easy using Cscope and I found :split quite useful for header files. After poking around for a while, I discovered adc.c and adc.h where the analog to digital conversions takes place and where I must make my edits.
In order to build the crazyflie-firmware it was necessary to grab the GNU Tools for ARM Embedded Processors. Installation was pretty self explanatory. I added the bin folder to my path and did a test run of make with the Crazyflie firmware. Check out the Crazyflie wiki here for details on building the project and make goals.
Picking the Right Sensor
While reading through the firmware, I was also searching around the internet for an ultrasonic sensor suitable for the Crazyflie. My requirements were that the sensor have a simple analog output, not weigh more than 5 grams, and take no more than 2.8 volts. The LV-MaxSonar-EZ0 fit these requirements nicely.
It’s worth mentioning that MaxBotix puts out a wide array of ultrasonic sensors, including one that it specifically recommends for quadcopters (check out their article on quadcopters here). However, the high performance sensors are a little bit heavier than the Crazyflie’s 5 gram limit and in addition required 3.3 volts. If you can solve the weight problem, the voltage problem can be dealt with using a step-up voltage regulator.
When the sensor arrived I hooked up its ground and +5 V pins to pins 19 and 20 on the Crazyflie’s expansion header respectively. I intercepted the signal via a breadboard with my multimeter and observed changing millivolt values as I moved my hand above the sensor face. This particular sensor operates at a 1 inch resolution, and is capable of sensing objects from 0″ to 254″. Objects closer than 6″ will read 6″. To scale the mV output the equation (VCC/512) is to be applied. In my case, this is 2.8/512 or ~5.5 mV per inch. Given that the Crazyflie’s VCC seemed relatively stable, I felt I had a pretty good scaling factor and accurate sensor ready for flight.

457 mV translates to ~83 inches, the distance from my desk to the ceiling.
FreeRTOS, and MCU Programming
FreeRTOS is a very simple task prioritization system on top of which the Crazyflie firmware is written. The idea is quite simple: given some tasks that need to run in near parallel on a single core, switch back and fourth between them to simulate concurrency. In the case of the Crazyflie, this includes power management, stabilization, radio communication, etc. Tasks are stubbed out in an infinite loop and the relevant context (memory) is loaded when they are activated. For my purposes, piggy backing on the adcTask (in adc.c) would be fine.
With my development environment set up and a general understanding of where the voltage values of my sensor would be read in code, it was time to dive into MCU programming. This quickly turned into a major research task as it turns out MCUs employ all sorts of low level systems I had never programmed before. Further, there was really no gentle introduction to MCU programming that wasn’t specific to a particular PCB. The gap between the reference manual and the books I found was quite large. This is the nature of this type of development and in an some ways what makes it fun. The Crazyflie is its own beast.
By far the most valuable resource I found was the example code on ST’s website in the STM32F103 Standard Peripheral Library. It’s worth mentioning that the STM32F103 website is extremely useful in general and has lots of documentation, sample code, stacks, etc. After looking through the Analog to Digital Converter (ADC) examples, I had a much better understanding of what I needed to initialize in order to start reading values from the proximity sensor. By reading the example code in conjunction with the reference manual, I was able to get my bearings. I moved back to the Crazyflie code and began dissecting the implementation of the ADC piece by piece. I quickly gained a grasp of how the ADC employed the Direct Memory Access (DMA), timers, and interrupts to convert raw voltage into meaningful values.
The high level breakdown of the Crazyflie ADC is as follows:
- Timer 1 kicks off the ADC 1, ADC2 follows by default
- ADC 1 fetches the reference voltage and ADC 2 fetches the battery voltage simultaneously
- The values are moved from the ADC by the DMA to SRAM and an interrupt is generated
- FreeRTOS adds the values to a Queue
- Periodically the adcTask (scheduled by FreeRTOS) runs
- Values are decimated (this is essentially averaging oversampled values to gain higher resolution; see this white paper)
- The battery values are cleaned and updated
In addition to the example code, a nice high level overview of MCU programming that is ARM specific is “Fast and Effective Embedded Systems Design” by Rob Toulson and Tim Wilmshurst. Although the target board is the mbed (which offers some nice layers of abstraction not present on the Crazyflie), the high level concepts carry over. I enjoyed reading the section about the ADC.
Coding and Debugging
Having completed the research phase, it was time to start writing and debugging code. A bit of searching led me to a fantastic JTAG debugger, the Bus Blaster V3. To drive the Bus Blaster, I needed to install openOCD. I ended up having some dependency issues with libusb on OS X that I was not able to resolve simply. I decided to upgrade my old copy of Macports to expedite the process. After cleaning out my local repository packages, updating the Macports repository links, and other housecleaning I was able to get openOCD installed.
I decided that I would keep my toolchain simple and debug using GDB. GDB is extremely well documented, so I won’t go into detail about how to use it. However there are a few things that have made my life easier:
- Make sure to connect the Bus Blaster to the computer before powering up the Crazyflie
- ‘monitor reset’ will restart the Crazyflie from within GDB (not a terrible idea before debugging)
- CTRL-C will halt the Crazyflie firmware. Sometimes this crashes GDB. Just kill the process; reset everything and start over
Connecting to the Crazyflie is just a matter of making the openOCD target in the crazyflie-firmware project to get the Bus Blaster to connect:
make openocd OPENOCD_INTERFACE=interface/busblaster.cfg
Then, connect to the CrazyFlie via gdb and point it to the firmware symbols.
arm-none-eabi-gdb -ex "target remote localhost:3333" cflie.elf

Debugging the Crazyflie with the Bus Blaster V3
With GDB properly set up integrating the proximity sensor with the Crazyflie was a pleasure. I learned a few things about pointers and structures I didn’t know (check out adc.c#adcDecimate for some fun) and gained a working understanding of the ADC code structure. You can find the final diff here.
The Results
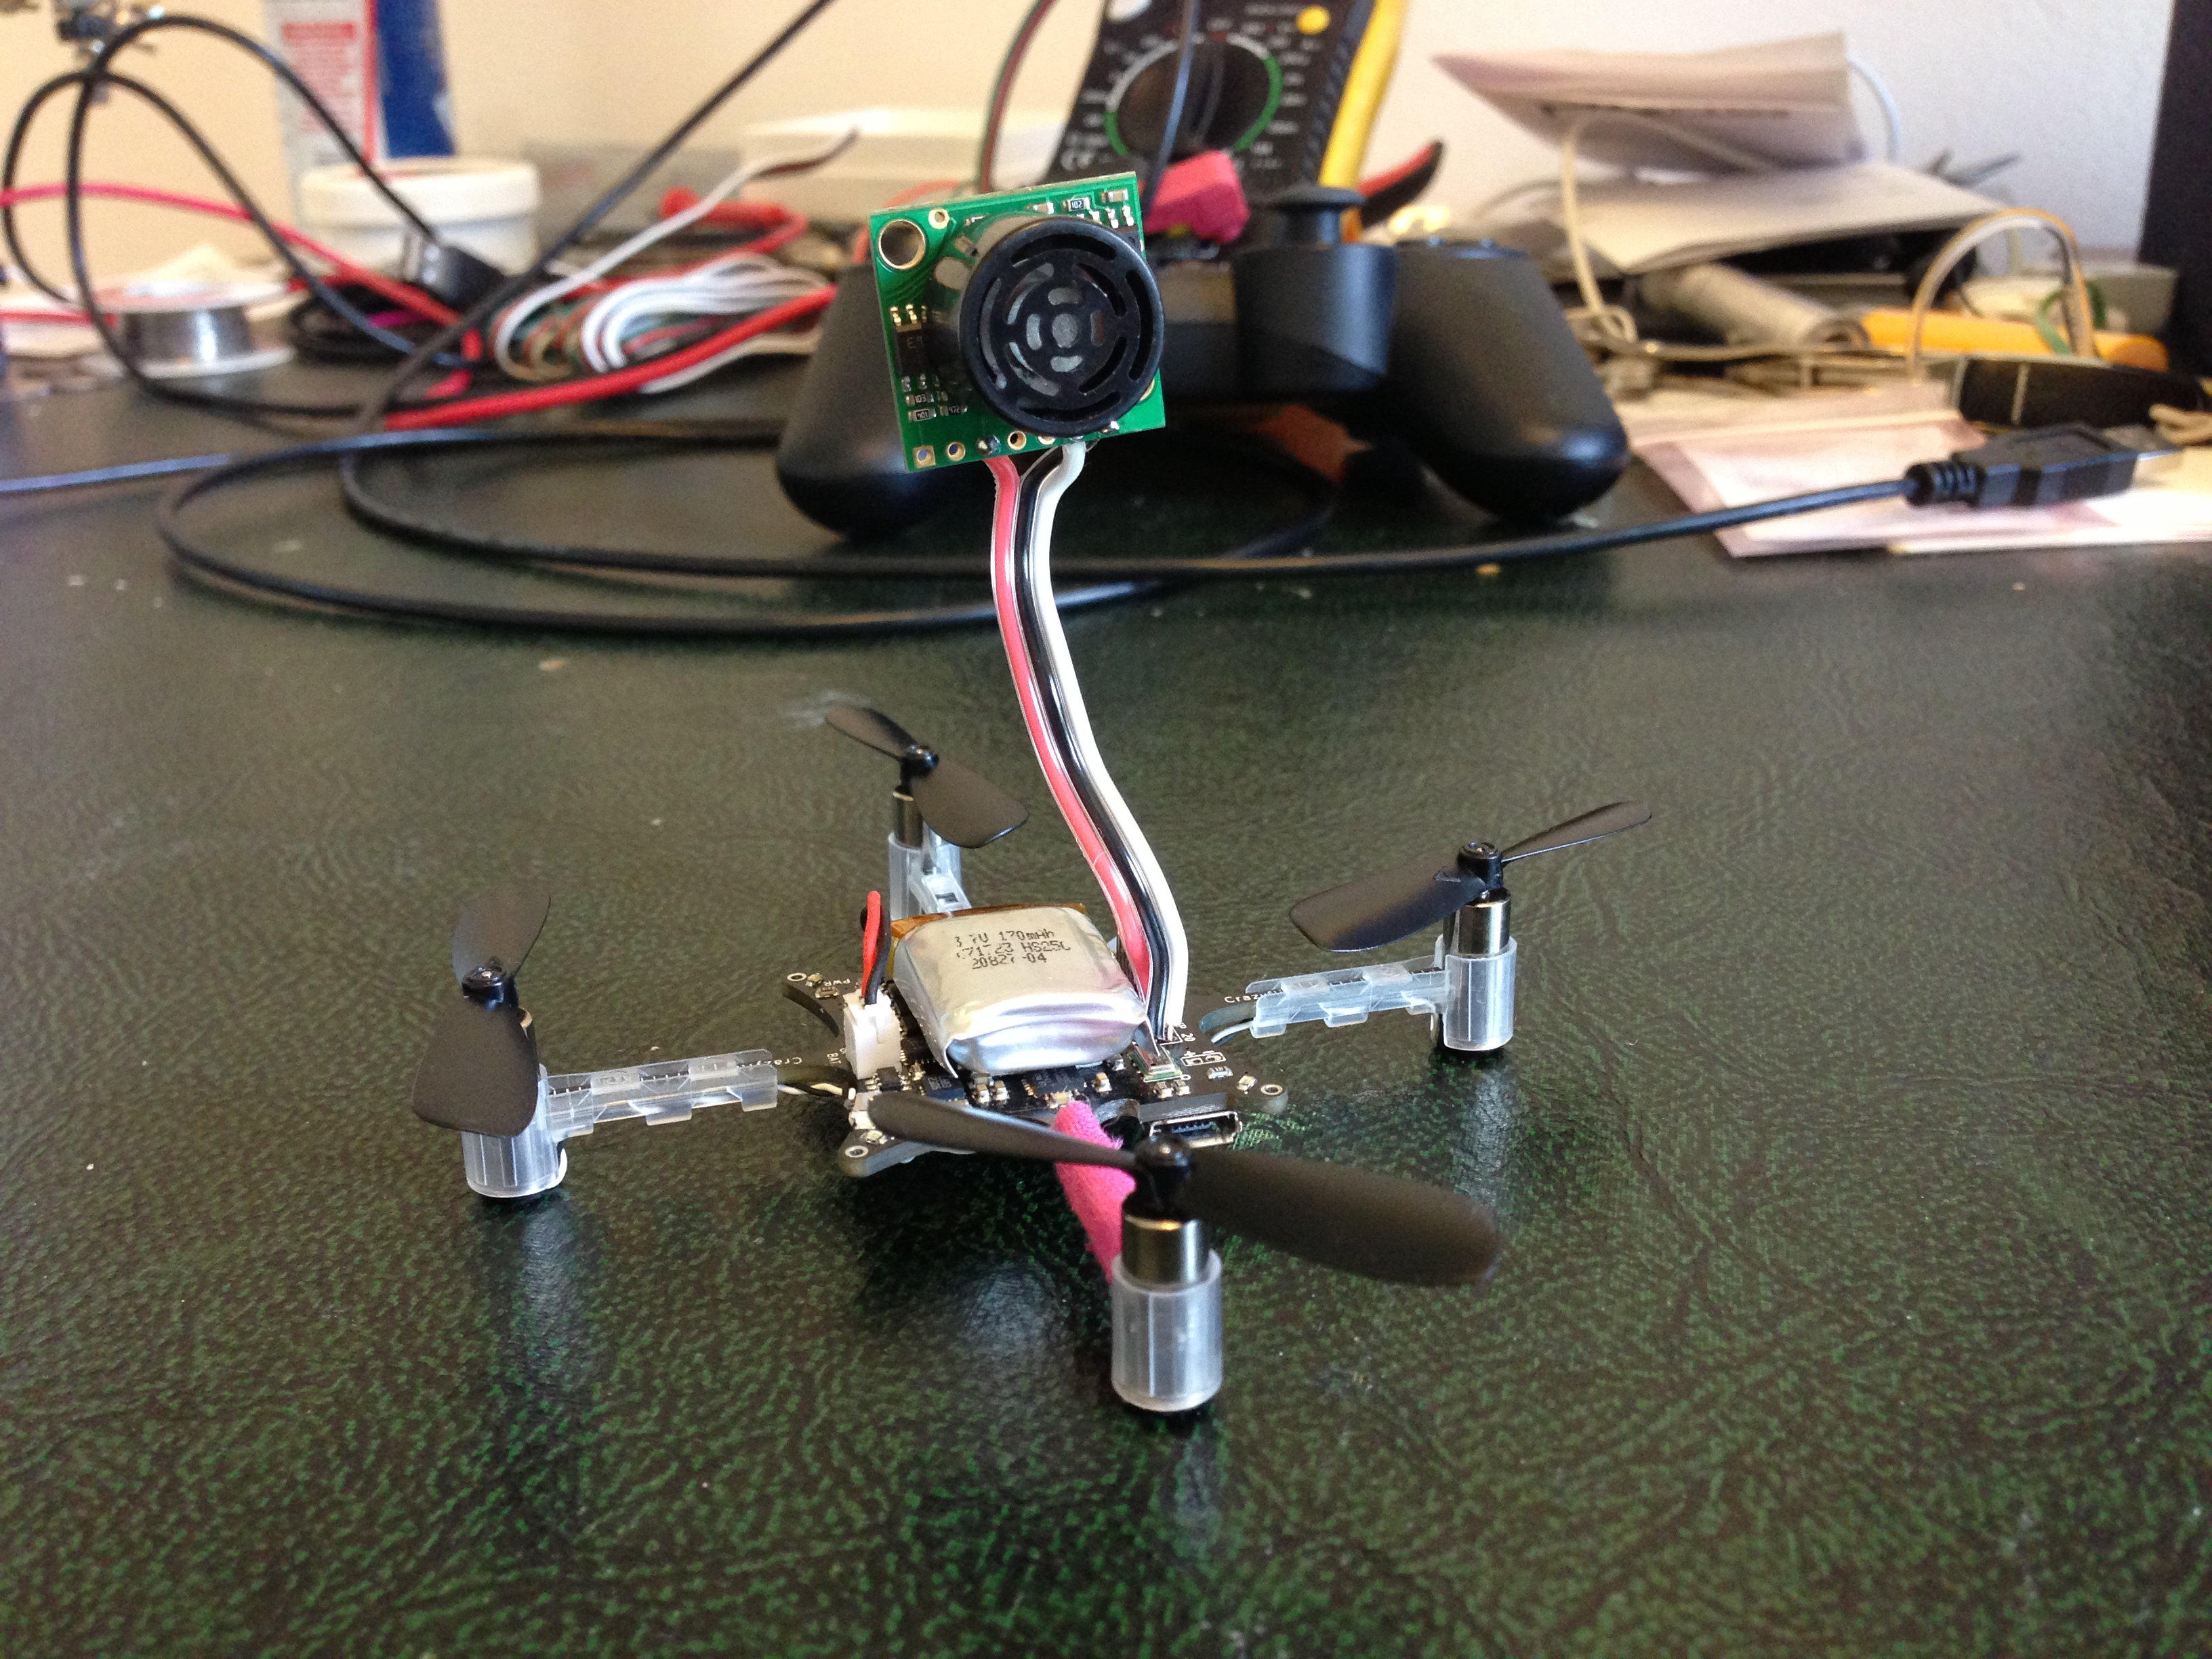
My Crazyflie with its “Bat Eye”
After the research, coding, and debugging was complete, I ended up with this slightly bug like quadcopter capable of detecting objects around it. Originally I hadn’t planned on mounting the sensor for this initial development phase. However, a few days after I completed the code I lay awake in bed and decided to give it a shot. It turned out to be the easiest part of the entire process.
The marriage between the proximity sensor and the Crazyflie is not yet perfect. Most notably, the battery life has been diminished quite a bit. After a few minutes of hovering the Crazyflie begins to have difficulty getting off the ground, sometimes only reaching 4 or 5 feet in height before gradually drifting downwards. The sensor readings are fairly stable. There’s some optimizations that can be done in terms of oversampling and speed of readings, but some of the spikes in the data are the limitations of the sensor itself.
Weight concerns and optimizations aside, it’s pretty cool flying the Crazyflie around and watching the graph of proximity readings. When I set out to interface the Crazyflie with a proximity sensor, my purpose was to add a sensor to the copter that would eventually allow it to avoid collisions. I believe this research and development work has reached that end.
Good luck, have fun!
